Thursday, October 17, 2013

Growing into the Winter

This past Tuesday, CORE/El Centro hosted a workshop on Gardening through the Winter.  Part of the class focused on the use of cold frames as a easy way to extend the fall harvest and get an early start in the spring!


Materials include: Wood for frame, old windows, hinges, hammer and nails.

Prepping the materials, Lander cuts angled pieces for the sides of the frames.
Our cold frames are 7" in front and 10" in back - slightly angled to capture more of the fall sunlight.

Screwing hinges to the back to hold the window to the frame.
Locking hinges on the inside will hold the frame open on warm winter days.


Workshop participants look on as volunteers put together the second rooftop cold frame. 


Friday, September 27, 2013

Preserving the Harvest

This month's healthy cooking class focused on local foods - and how to eat locally year round!

Farm-fresh vegetables ready to be preserved! 

Participants watch as Renee preps peppers for freezing.

Shredded zucchini is great out of the freezer, thawed and baked into bread! 


Home-made vegetable stock is easy to put together from left-over onion peels, carrot tops and potato skins! 


Our ice bath ready to cool down the blanched broccoli


Purple broccoli, post-steaming, is quickly cooled before going into the freezer.

Fresh vegetables ready for the freezer! 

Thursday, September 19, 2013

Seed Saving 101


For those who were unable to make it to the Seed Saving workshop this month, here are some tips, notes and photos!


Why save seeds?
  • It's Cheap! And you end up with basically a free crop for next year
  • It's an important way to save heirloom varieties that are otherwise being lost from our food system
  • Plants adapt to local conditions and can grow better next year

What do I need?

Depending on the seeds you are planning to save, basic tools you'll need are knife, cutting board and paper towel. If tomato seeds are on your list, then you'll also need a jar with lid and water.


Which seeds to save or not save?

  • Squash and sweet corn (male/female flower parts) can cross-pollinate and may not necessarily be good the second year
  • Carrots/beets are biennial plants, so it takes two years for them to go to seed. It's possible, just more difficult.
  • Tomatoes, peppers, beans and peas are easy plants to save seed from.
  • F1 hybrid seeds were cross-bred and may not produce desirable results (or not even produce at all!) Open pollinated seeds are heirloom varieties that will yield 'true' generations.
How to save seeds, some common examples:
  • Save seed from the most vigorous, healthy plants as these will have the 'strongest' seeds (e.g. natural selection)
  • Tomatoes/Cucumbers (see photos below): allow fruit to fully ripen and scoop out seeds and pulp. Place in jar of water for 24-76 hours, to ferment (this releases the lining on the seed, allowing for future germination), stirring the seeds every day. Once seeds have sunk to the bottom, pour liquid away and rinse. Dry on paper towel (preferably out of sunlight) and once completely dry (up to 3 weeks!) place in envelope.
  • Peppers: Let pepper fully ripen on fruit and wait until skin starts wrinkle. Remove from pepper and let dry on paper towel. Then place in envelope.
  • Peas/Beans: Allow pod to ripen on stalk and start to dry and turn brown. Spread them out on a tray indoors to dry, waiting at least two weeks before shelling. Or you can leave them in the pod until next spring when ready to plant.
  • Carrots/Beets: As a biennial plant, carrots (like beets) won't flower until early into the second year after planting. If you want to collect carrot seeds, leave a few in the ground to overwinter and collect seeds once the flowers have seeded and dried the following spring/early summer.

How to store seed:

  • Seeds are best stored in paper envelopes in a cool, dark area where temperatures don't fluctuate much.
  • Make sure to label your envelopes well with variety type and year. You may even want to leave a few  notes for yourself to remember for next year.


Tomato Seed Saving Photos
When you cut open your tomatoes, you'll see the seeds surrounded by their pulp/coating.
Squeeze all of this out into the jar.


After you squeeze out the pulp and seeds into your jar, throw the rest of your
tomatoes into a blender to make a quick salsa or add them
to your compost pile for next year's crop.


Thursday, September 5, 2013

Field Trip: Central Greens


Yesterday, we took a trip to Central Greens, Milwaukee's newest aquaponics venture focused on the innovative fish-as-fertilizers model.  Central Greens, located near Miller Park, is a family-run business located on a once-run down site in the Story Hill neighborhood of Milwaukee's west side.

Fish

Although Central Green's main focus is fresh salad greens and herbs, fish like tilapia play a major role in their business model. Simply stated, water is circulated through large fish tanks where it picks up nutrients from the fish waste and is then circulated through a hydroponic greenhouse full of lettuce, basil, and other greens and herbs.

This not-too-large 'fish house' stays nice and warm thanks to the large tanks of heated water


Inside the fish tank: a tube system helps to circulate the water
The powerhouse of the system: tilapia


Emma showing CORE/El Centro interns how the water is filtered before it heads out to 'feed' the plants.


Fertilizer

While Central Greens is able to sell a number of tilapia to restaurants for additional revenue, the greens are where they really see their 'green.'

Coir (coconut husk) forms the base for some seed starting trays


Small plants on their way to the hydroponic green house


Central Greens created small 'rafts' for their seedlings to float on.
They push the older plants up stream while loading on new arrivals.

An alternative form of seedling tray - instead of individual pods, all plants are on one large flat

Rows of fresh, nutritious greens getting ready to join someone's kitchen counter. Notice the height of plants at the end - once they reach the end of the greenhouse they are ready to be harvested. Brilliant! 


Thursday, August 22, 2013

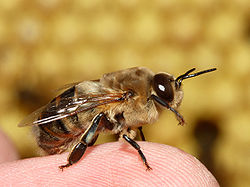
Caste System in The Honey Bee Colony: Drone, The Male


The Male Of The Honey Bee Colony: The Drone


     It comes as no surprise to beekeepers that most people, get a kick out of the fact that the hive is mainly female. This comes from the fact that 10 to 20 percent of the hive is male. The drone is easily spotted by their large eyes, medium size body and long legs.

     A drone is the result of an unfertilized egg. Normally, a Queen bee will deposit the unfertilized egg in a drone cell. A drone cell, compared to a worker cell, is slightly larger. Unlike the worker bee, the drone will take 24 days from egg to Adult.
     
     When the egg is laid it will take three days for the larva to hatch. On the 11th day the larva is mature enough to be(e) capped. This capped cell is easily noticed since the cell is dome shaped.
This is because the drone is slightly larger than the worker bee so it will need more space to develop in. On the 24th day the adult drone will emerge. Soon after the drone will begin his journey out of the hive. At the peak of summer there can be(e) about 200 drones on average.
     Drones do most of their flying in the afternoon. Their search in the afternoon is mainly to find a unfertilized queen bee to mate with. Interestingly enough, the drone will mate with the queen bee in midair and once he mates with the chosen queen he dies. But he has completed the task that nature has given him.

     Other than mating, Drones do not have any other specific task. They do not defend the hive since they do not have a stinger. For this reason they are easily picked up by a beekeeper with their bare hand! Additionally, the drone has a tiny proboscis, "tongue", and is not able to feed themselves. Thus, the worker bees must feed them.

     Later in the fall, the queen will lay fewer drones since mating season is over. As winter approaches, the worker bees will begin to drive the drones out of the hive. This phenomenon is the result of the hive no longer needing the drones for the winter and to conserve as much resources as possible.

     Thus the life of a Drone is over. Nevertheless, their numbers will reappear as mating season begins.

Tuesday, August 20, 2013

Planting Seeds for our Future

This year was one of many 'firsts' for CORE/El Centro's Garden and Nutrition program, including our first annual Kids Camp, held August 5-9th.  The 40-hour camp covered a number of topics through a variety of activities - from videos and coloring pages, to hands on soap making and composting.  Our 18 participants learned a lot, made new friendships and all left eager to return next year.

I'm including just a sampling of photos from the camp - more to come via video.  Enjoy!


Getting their hands dirty with Kompost Kids


Campers work to cut out pictures for their MyPlate project.

Finding pictures of the 5 food groups: Dairy, fruits, vegetables, grains, and protein.

All Finished! 

Painting the inside of their pizza box with black paint to absorb the sun's heat

Campers fill their solar oven pizza boxes with paper for insulation.

Solar oven pizza melting in the sun

A group shot after a presentation by Charlie, from Beepods. 

Decorating seed pots in preparation for planting

Saturday, August 3, 2013

Skin of the Earth

This Summer, I visited a friend in Minneapolis and made sure to make a stop at the University of Minnesota Bell Museum of Natural Science to check out Dig It! Secrets of Soil. The exhibit, organized by the Smithsonian Institute and supported as a traveling exhibition, offers a wealth of information and some hands-on activities examining this most precious of resource! 


The three main components of soil: sand, silt and clay combine to form Loam - the farmer's dream! 

This display shows the way that water flows through soil, depending on the size of particles.  Sand, being the largest particle, lets water run freely through while clay, the smallest particle, holds water.  When gardening we ideally have a healthy mix of all particles - allowing for some water retention, but also needing air and space for roots to grow into the soil and water to release as to prevent 'choking' the roots.

A very cool look below the surface - what diversity exists just in our country! 

One of my favorite parts of the exhibit was this area, showing different soil samples from around the U.S. It's a great reminder of how diverse our Earth is, and what incredible history She has!

Soil, taken from Antigo, to show Wisconsin's beautiful silt loam - prime soil for agrictulture

Wisconsin's State Soil, officially named in 1983, is Antigo Silt Loam, shown above.  Though Wisconsin has over 500 soil types, the Antigo Silt Loam is what has made our state a productive agricultural hub of the midwest. Over 10,000 years ago glacial meltwaters deposited sand and gravel in our area which now forms the lower subsoil and substratum (2-3 feet under ground).  Strong winds and further melting of glaciers then brought in the silt and loamy outwash which covered the lower sand/gravel deposits. These two layers ensure good soil drainage, while the hardwood forests of northern Wisconsin helped to develop the beautiful topsoil which has fed thousands of farming families and their customers.


Caption reads: What is 45% minerals, 5% organic matter, 25% water, and 25% air?  A midwestern farmer's dream - the ideal loamy soil.